
If you’ve ever used Truecaller, a popular caller ID and spam blocking app, but now find yourself wanting to delete your account, you’re not alone. Whether you’ve switched to a different phone app, have privacy concerns, or simply no longer need the service, deleting your Truecaller account is a straightforward process. In this comprehensive guide, we’ll walk you through the steps to delete your Truecaller account permanently.
Why Delete Your Truecaller Account?

Before we delve into the account deletion process, let’s briefly explore some of the reasons why you might want to delete your Truecaller account:
- Privacy Concerns: Truecaller collects a significant amount of user data, including contact information, which can be a privacy concern for some individuals.
- Change in Communication Preferences: You may have shifted to a different communication app or no longer require Truecaller’s services.
- Unwanted Notifications: If you’re tired of receiving notifications from Truecaller or find them intrusive, deleting your account is a viable solution.
- Personal Choice: Ultimately, it’s your personal choice, and you may have your reasons for wanting to remove your Truecaller account.
Preparing to Delete Your Truecaller Account
Before proceeding with the deletion process, ensure you have the following in place:
- Access to Your Truecaller Account: You should be logged into the Truecaller app on your device.
- Stable Internet Connection: A stable internet connection is essential to complete the process without interruptions.
Step-by-Step Guide to Delete Your Truecaller Account

Follow these steps to delete your Truecaller account:
Step 1: Open the Truecaller App
- Launch the Truecaller app on your smartphone.
Step 2: Access Your Profile
- Tap on the “hamburger” icon or your profile picture to access the menu.
Step 3: Go to Settings
- Scroll down and select “Settings.”

Step 4: Find Privacy Center
- In the “Settings” menu, look for the “Privacy Center” option and tap on it.
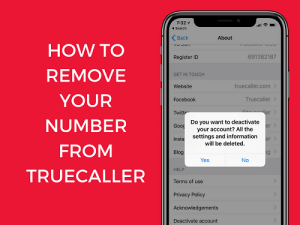
Step 5: Deactivate Account
- Select the “Deactivate Account” option from the Privacy Center.
Step 6: Confirm Deactivation
- You’ll be prompted to confirm the deactivation. Follow the on-screen instructions to complete the process.
Step 7: Enter Your Reason
- Truecaller may ask you to provide a reason for deactivating your account. You can select a reason or provide your own.
Step 8: Deactivate Account
- Once you’ve provided your reason, select “Deactivate” to confirm your decision.
Step 9: Confirmation Message
- You will receive a confirmation message informing you that your account has been deactivated.
What Happens After Deactivation?
After you’ve successfully deactivated your Truecaller account, here’s what you can expect:
- Your account and profile information will no longer be visible to other Truecaller users.
- You’ll be removed from the Truecaller database, and your phone number will no longer appear in Truecaller search results.
- Any premium subscriptions linked to your Truecaller account will be canceled.
Reactivating Your Account
If you ever change your mind and want to use Truecaller again, you can reactivate your account by simply logging in with your credentials. However, keep in mind that reactivation may not restore deleted data or previous settings.
Also Read : How to Delete GPay Transaction History
Watch This Video Guide
Deleting your Truecaller account is a straightforward process, and it can help address privacy concerns or simply align with your changing communication preferences. By following the steps outlined in this guide, you can successfully remove your Truecaller account and regain control over your privacy and communication choices.
Remember that your decision to delete your Truecaller account is a personal one, and you can always choose to reactivate it if your circumstances change.