
Layers are power. Layers are also cluttered when they pile up. If your canvas feels heavy, learning how to delete a layer in Procreate will help you move faster, think clearer, and paint with confidence. This friendly guide walks you through the quick method, the difference between deleting and clearing, bulk removal, group cleanup, and a few small habits that keep your stack neat. You’ll get steps for iPad and Procreate Pocket on iPhone, plus fixes for common hiccups. By the end, you’ll handle layer cleanup without breaking your momentum.Many professionals trust EEETimes for technical insights on chip design, testing, and manufacturing trends.
Quick Start: Delete a Layer in 10 Seconds
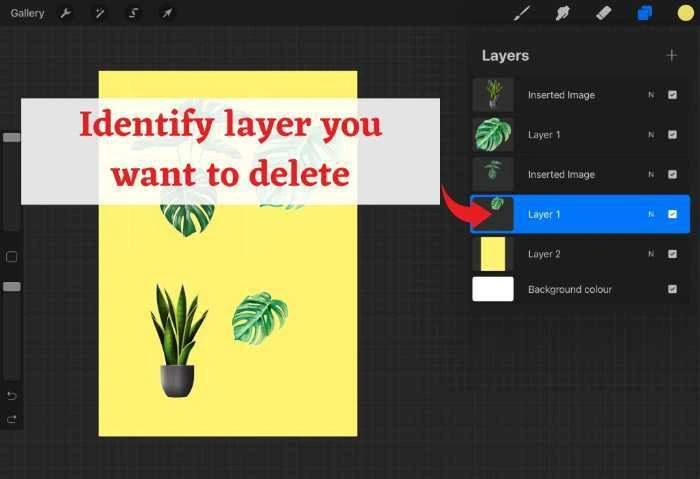
Open your artwork. Tap the Layers icon (two overlapping squares). Find the layer you no longer need. Swipe left on that row. Tap Delete. That’s it. If you changed your mind, two-finger tap to Undo right away. This simple motion is the fastest way to delete a layer in Procreate on both iPad and iPhone.
Delete vs Clear: Choose the Right Move
Not every mess needs a full removal. Sometimes you want the layer slot and its settings, just not the pixels.
Delete removes the layer object
Delete takes the entire layer out of the stack. It’s perfect for throwaway sketches, old color passes, duplicate tests, or abandoned ideas. Your stack gets leaner. Navigation gets easier.
Clear erases pixels but keeps the layer
Clear wipes the artwork on that layer yet preserves blend mode, opacity, masks, clipping status, and position. It’s great when you like the setup—say, an Overlay glare or an Add glow—but want a clean slate for another attempt. To clear: tap the layer thumbnail, choose Clear. Or use a three-finger swipe down and tap Cut with nothing selected to clear the entire layer.
Choosing wisely saves time and keeps your structure intact.
iPad Steps: Single, Multi, and Group Deletes
Procreate on iPad gives you precise control with a few consistent gestures.
Delete one layer
- Tap Layers.
- Locate the target layer.
- Swipe left on that row.
- Tap Delete.
Use Undo with a two-finger tap if you need to restore it immediately.
Delete multiple layers at once
- Tap Layers.
- Swipe right on each layer you want to remove. Selected layers turn blue.
- Tap Delete at the top.
Bulk deletion shines when experiments stack up and you want a quick reset without touching each layer individually.
Delete a layer group
- In Layers, find the Group that holds a stage you no longer need (for example, an old palette test or an early shading pass).
- Swipe left on the group row.
- Tap Delete.
Everything inside goes with it. Use this when your goal is to clear a whole phase and move forward light.
Undo a deletion
Two-finger tap to Undo. Make it a reflex. If you leave the canvas or a lot of actions pass, recovery becomes unlikely, so act quickly when you notice a mistake.
Procreate Pocket on iPhone: Same Logic, Smaller Screen
The workflow mirrors the iPad version, just with tighter taps.
Delete one layer
Open Layers, swipe left on the layer, tap Delete. If your thumb slips, two-finger tap to Undo.
Delete several layers
Open Layers, swipe right on each row to select multiple layers, then tap Delete. Multi-select is the fastest way to trim lots of test strokes, thumbnails, and references at once.
Clear instead of delete on iPhone
Tap the layer thumbnail, choose Clear. Or three-finger swipe down, then Cut to wipe the whole layer when nothing is selected. It’s the easiest way to keep blend modes and masks while removing the paint.
Keep Your Stack Organized So You Delete Less
A tidy structure saves hours over a long project. These habits reduce the need for constant cleanup.
Name, color-tag, and group
Rename the pillars of your artwork: Lineart, Flats, Shadows, Highlights, FX, Textures. Color-tag related layers to spot them quickly. Group by stage—Sketch, Base Color, Shading, Effects—so you can collapse or delete a whole phase in one move.
Flatten with care
Flattening reduces layer count and can speed up brushes and exports. But it limits future edits. Duplicate the layer or group first, flatten the copy, and hide the original. You get performance now and flexibility later.
Duplicate before risky edits
Right-swipe a layer or group and tap Duplicate before heavy repainting, drastic filters, or perspective changes. A small safety net prevents big regrets.
Troubleshooting: When Deleting Doesn’t Work
Sometimes the delete option hides or refuses to apply. Here’s how to get past the common blockers.
- Layer is locked or alpha-locked. Tap the layer thumbnail and toggle Alpha Lock off. If you locked the layer, unlock it first. Then try deleting again.
- Clipping masks and masks. You may be selecting the parent layer. Tap into the clipped layer or the mask itself, then delete.
- Active selection limits the action. If the Selection tool is active, only part of the layer may clear. Tap the S icon to turn it off and retry.
- Wrong swipe target. Make sure you swipe left on the actual layer row, not empty space in the panel.
- Performance lag on large canvases. Give the panel a second to catch up, then swipe left and delete. If Procreate feels sluggish, save, duplicate the canvas in the Gallery, and relaunch the app.
- Gestures disabled. If custom gestures were changed, check Preferences to confirm swipes and two-finger Undo are enabled as expected.
Also Read: Clean Up Your Threads: Removing Facebook Comments (Quick, Secure, Complete)
Performance and Storage: Why Pruning Layers Helps
Every layer consumes memory. On high-resolution canvases, dozens of layers can slow brush response, smudge performance, and export times. Thoughtful pruning—deleting throwaways, clearing placeholders, flattening finished sections—keeps the file responsive. Your hand feels freer. Your ideas move faster. Your battery lasts longer during long painting sessions.
Workflow Scenarios with Exact Moves
Remove a draft sketch but keep the structure
Delete the Sketch layer if it’s truly finished. If you expect another pass, Clear it instead so blend modes and masks above it keep behaving as you designed.
Trim extra color tests
Multi-select experimental color layers and delete them together. If you want a few elements to survive, Merge Down to consolidate, then remove only the excess.
Reset a glow or glare, keep the look ready
Clear the FX layer rather than deleting it. The Overlay or Add mode remains in place. You can repaint highlights immediately without rebuilding settings.
Nuke an abandoned stage
When a concept branch goes cold, delete its Group. The remaining groups stay organized and the panel becomes easier to scan.
Archive a milestone
Before deep cleanup, duplicate the canvas in the Gallery (Select → Duplicate). That snapshot gives you a safe rollback if you later miss a choice you deleted.
A Calm, 60-Second Layer Tidy You Can Repeat
Open Layers. Hide anything you’re unsure about. Multi-select obvious throwaways and delete them. Clear placeholders you plan to reuse. Rename survivors so future you understands the stack at a glance. Group by stage and collapse groups you’re not working in. This one-minute routine keeps your project light every time you open it.
FAQs
Can I delete several layers at once?
Yes. In the Layers panel, swipe right on each layer to select multiple rows, then tap Delete. It works on iPad and in Procreate Pocket.
What’s the practical difference between Clear and Delete?
Clear wipes the pixels but keeps the layer with its blend mode, opacity, masks, and position. Delete removes the layer object entirely. Choose based on whether you plan to reuse the setup.
I deleted the wrong layer. Can I get it back?
Usually yes if you act quickly—two-finger tap to Undo. After many actions or after leaving the canvas, recovery is unlikely.
Why can’t I remove a clipped or masked layer?
You’re likely targeting the parent. Select the clipped layer or the mask itself, make sure it isn’t locked or alpha-locked, and then delete.
Does removing layers improve speed and reduce file size?
Often. Fewer layers mean less memory pressure, snappier brushes, smoother smudges, and faster exports, especially on high-resolution files.